Sorry for the lack of posts lately, with the warmer months here most of my time has been taken up with outside jobs and not much time for trains. I'm expecting to get another Shapeways order this week. I'm hoping i've solved the bending promblem i've had with the signal mast. There some other goodies in there as well which i will share when they have arrivied.
Etching, its taken awhile but i think i have found a small suitable pump for the spray tank. Most of the pumps i've seen for acid have been way to big for what i need. I plan to build the tank in Jan and start etching and than finaly get to lay some rails on those sleepers i laid 2 years ago. Its taken way to long, but thats life. Once ive got the set up right hand laying the track will go quickly.
Well thats it for now, will post some pics of the 3d printed parts when they arrive. I hope everyone has a great Christmas and a Happy new year.
Tuesday, 23 December 2014
Tuesday, 30 September 2014
Bits and pieces
Well i've done another etch which worked ok. I used ammonium persulphate as the etching solution. I feel this worked better than the other solution i used. The only down side is that i have to heat and keep it at about 70 degrees. Something i will have to work out. I'm thinking of having the solution siting in a small contaner of hot water to keep it warm. I'm still going to have to make a small spray tank for etching. The dip method just doest cut it for what i want to do.
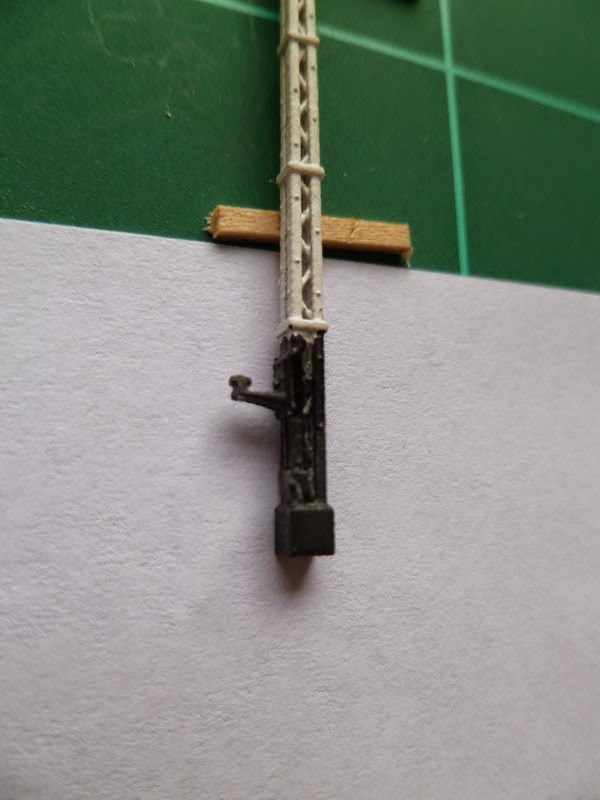
Got another shapways order, which once again prove to be a miss print again. I'm working with shapeways now to sort out what went wrong. You can see in the photos below that the ones on left are good which i had done earlier this year and the parts on the right are the bad prints. Notice the blur along the straight lines and over print on the parts.


Here some photos of the semaphore signals ive been working one. These are nearly ready for realese. I'm still having problems with the bend in the mast. I think this is been caused by the ladder pulling down on the mast when it is cured in the oven at shapways. Some more testing to be done.


 In the ment time still working on other projects as well. I'm about to start on a second Y class diesel. I've got a new chassis design from Spirit design which will place the loco at the correct height. Now just need to work on my light holder design and put it all together.
Got another shapways order, which once again prove to be a miss print again. I'm working with shapeways now to sort out what went wrong. You can see in the photos below that the ones on left are good which i had done earlier this year and the parts on the right are the bad prints. Notice the blur along the straight lines and over print on the parts.
Here some photos of the semaphore signals ive been working one. These are nearly ready for realese. I'm still having problems with the bend in the mast. I think this is been caused by the ladder pulling down on the mast when it is cured in the oven at shapways. Some more testing to be done.
Friday, 19 September 2014
Etching away
Well after a few busy weeks leading up to hosting the boys from VNSC over the weekend I finally got around to getting some more etching done. This was the first time I got to use the new brass sheet I bought. I'm using a 1/2 hard sheet. I have a feeling the other brass sheets I was trying to use in other etching were not 1/2 hard, hence the funny results I was getting. I used the same process as before. The end result I was fairly happy with, close to been perfect. I had made a few changes to the design of the plates to make them better. I expanded the gap between the two spike heads so the rail could sit in better and I also made the plates a little bit narrower. In making them narrower I had to delete the small square hole in the design that's next to the spike head.
I'm still not 100% sold on a etching solution yet. The one I used was ok, but does take a while to etch and I believe because of that it rounds of the square edges more. I'm going to give Ammonium persulphate another go. They only draw back is that the solution has to be heated but it may be a small price to pay for a better etch. Sorry no pics this time our camera has gone missing in action.
I'm still not 100% sold on a etching solution yet. The one I used was ok, but does take a while to etch and I believe because of that it rounds of the square edges more. I'm going to give Ammonium persulphate another go. They only draw back is that the solution has to be heated but it may be a small price to pay for a better etch. Sorry no pics this time our camera has gone missing in action.
Saturday, 9 August 2014
What August already
Time is flying again! Ive been doing some more work on the 3D printed signals i'm nearly ready to go into full production. I'm still working on ways to make the moving parts work better. I think i will release non moving ones first, that way people can start to enjoy my signal. I think there will be only a few that will want to try and have moving signals. For now getting the moving parts installed in the final position is still a bit fiddly which im trying to improve on. I've got a few idea just have to see if they will print out ok.
My last print from Shapeways was a bad one. Something happen when i uploaded the file and the items did not print ok. I was also doing a test on the windows and when they came back to me the windows were all filled in. The signal mast had a bend and a twist as well.
Etching, I'm hoping to get back into this sometime this week or next. I'm using some different brass sheets from before that will arrival this week. I think i know what was going wrong in the last lot of testing. Once i get this right i will go into track laying mode. YAY Its been a long wait, but it will be worth it in the end.
Below are some shots take from a friends layouts which is still under construction. The standard of work is very high. Something i hopping to do. The scenery is just brilliant but the work under the bench is just as good. Its a very high tech layout with local panels and also computer interfacing as well and very neat wiring to go with it all.
Please enjoy. Click the pics to make bigger


Friday, 4 July 2014
July Update
Hi all, life is keeping me busy, but i've had some time to do some modelling. I've had a second run of 3D items which worked out ok. They printed many items on a different axis which resulted in a poor print. This was ok as I had forgot to add many items back onto the signal post while editing the things I need to fix. I now have a 3rd run in the post and hopefully I've got it all right so I can write up instructions and than do a production run. In the mean time I have been working on other 3d printed objects and also learning more parts to Cubify software program. Recently I've started work on the spray etching tank. I'm hoping this will give me a good enough result to start etching my sleeper plates and than finally start building track, which is very over due. I'm hoping to finish the tank within the next two weeks and ill post some pictures than.
Well I think that's it for now, hopefully I will have good news about my 3d printed signals this week and I look forward to making them available to everyone. Below is a lovely picture of R 761 in the sunlight. The photo was taken from Steamrail website, which is well worth a visit.

Well I think that's it for now, hopefully I will have good news about my 3d printed signals this week and I look forward to making them available to everyone. Below is a lovely picture of R 761 in the sunlight. The photo was taken from Steamrail website, which is well worth a visit.
Friday, 9 May 2014
My first 3D print
Well i have got my first 3d print from Shapeways and i'm fairly happy with how it went. There are a few things i need to change i'm always pushing the design rules. A few holes need to be bigger and a couple of items need to be made bigger so they can print. This is just a quick post just to get some of the photos up. I will do a full review soon. I rushed the paint job, had a few bad brushes and a used a new undercoat. I did't like it so i will go back to my old one. This one was to thick. I wanted to get it reday for a meeting and had very little time this week. As it was only a test piece im not to fussed about it. The signal finial printed in two pieces so i had to glue it back on. Design fault. opppys! Signal lamp has a Nano led in it. Look great when turned on. The rail chair for the turnout im really happy with as well. Anyway here are the pics, more info to come soon. Enjoy
Note The camera picks up the printing layers, but to the eye it had to see them in real life.
Click the pictures to make them bigger
Sorry about the photo placement. I'm still having trouble with the way it is letting place the photos


Note The camera picks up the printing layers, but to the eye it had to see them in real life.
Click the pictures to make them bigger
Sorry about the photo placement. I'm still having trouble with the way it is letting place the photos


Wednesday, 26 March 2014
3D Printing Preview
Well as promised here are some screen shots of the 3D printed items i've been working on. The drawings are all at different stages of production. I use a software program called Cubify Design. Its is fairly easy to use, but it is like learning a new language and there have been some frustrating drawing sessions. Progress is going well and I'm hoping to send off the first test print very soon. Most of the items are very slightly over scale. This really frustrated me, but to make it all work it had to been done. When look back at now its ok, as it all blends in well because they are all slightly over scale so it can't be noticed unless you get the ruler out. Enjoy
Click on the picture to make bigger
2 Position Semaphore signal
In the stop position


In the proceed position


 There is still more work to been done on the post. The weighted arm and its bracket are still been drawn and also the cable wire wheel also needs to be done. I would like point out there are a few parts that will get printed separately to allow for them to move.
Joint bars


 This part is used on the turnout to brace the rail on the outside where the point blades are. It will add a nice touch to my turnouts, hopefully.
WSA turnout lever


The frame work is not finished yet but I'm hoping these work like a treat. When the yard turnout moves, the lever moves as well, very cool i think. If you haven't noticed i like things to move on my layout. I feel it adds so much to it.
Well i hope you have enjoyed looking at what I've been working on. Hopefully in the next post i will have these parts in my hands!
Any question on 3D printing feel free to email me at bendigonscale@live.com.au
cheers
Click on the picture to make bigger
2 Position Semaphore signal
In the stop position
Showing the whole signal
(note concrete base missing)
Joint bars
These parts are going to be used to join the rails together. I was going to etch these at first but i can get far better detail with 3D printing. I'm not sure if i will do multiple prints of these or do a fret and than cast them. Still thing about this.
Rail brace
WSA turnout lever
 |
| In the reverse position |
Well i hope you have enjoyed looking at what I've been working on. Hopefully in the next post i will have these parts in my hands!
Any question on 3D printing feel free to email me at bendigonscale@live.com.au
cheers
Subscribe to:
Posts (Atom)