Thursday 22 December 2011

Where has the time gone

Well its been some time since ive been able to post a blog. This time of year is always busy with work, family events on and even laundry renos all the above equal not much time for trains.  I'll give you a quick up date on the T3. I was hoping to get this model finished by now but i had to do so more mods on the shell and chassis to make things fix, than first thought.  Not much room to play with.  Ive tested the decoder with a 13mm speaker and it sound is really good for the size of the speaker. 

Design work on the turnouts is on going. I found a couple a faults which are now fixed.  Im planning to make a turnout soon using the old fashion way of following a paper template.  What i have done tho is put together a spirit design water tank.  This kit is small so i was able to find some time to do it.  All up it took me about 2hrs of work to do including the little extras i added.  Below are some construction, painted and than weathered photos.

Click on the photo to make it bigger


Lightly weathered
Lightly weathered


Well this year been all about learning and planning.  Im hoping that 2012 will be a year of construction. I hope to start building Bendigo A box area at the start of feb.  Im really looking forward to that stage of bendigo.  Well i like to wish everybody a merry Christmas and a happy new year. What ever you do over the holidays make it a safe one and happy modelling for 2012.

As always im always looking for photos of bendigo yard around the late 60's early 70's please send them to bendigonscale@live.com.au  Please feel free to comment on anything in my blog, no question is to silly. 

Tuesday 1 November 2011

VR T Class Series 3 diesel electric

victorianrailways.net
PART ONE- SUPER DETAILING & WEATHERING

Well its been a busy few weeks but as posted in my last post I'm doing a three part blog on the new VR T3 that has come out from Aust-N-Rail.  For some people super detailing is a process that might end up in the too hard basket, but I'm going to give it ago anyway. This is the first time Ive added detail to a loco.  I have seen other people do it and Ive found by talking to them on how they have done it has given me hope that i can too do it.  Most of the time its just knowing what people have used that makes the job so much better.

Super Detailing
I will talk about weathering later but first i will go through the steps on what i did to the loco and what i used.

1. Headlights
I first drill out the holes for the headlights and the marker lights. I used a .3mm drill for the maker light holes and a .4mm for the headlights.  I used these sizes as i have this already in optic fire.  I will talk more about this in part 2. I found drilling the hole a bit tough as the drill bit would get stuck often, i was given a tip after doing this to use a little bit of turps at the end of the drill bit. I wanted to drill out the holes first as before i weathered the loco.

2. Top of the loco
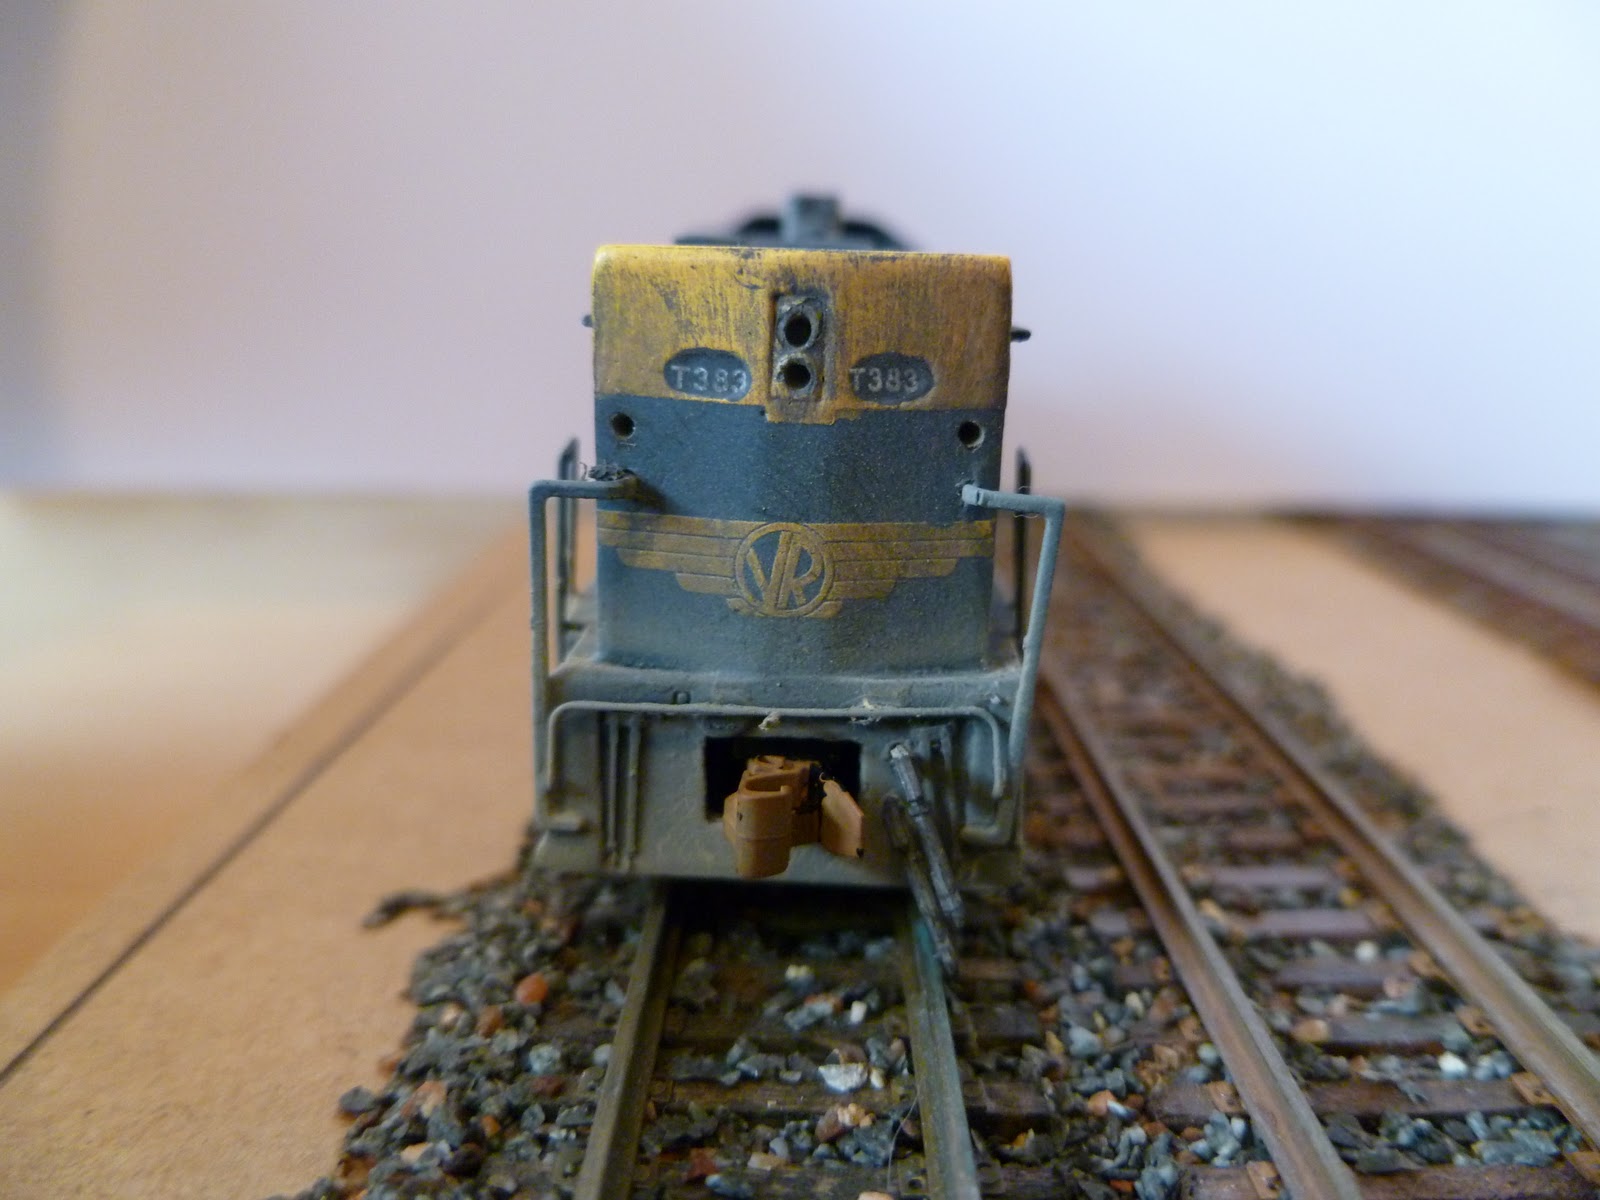
I then went to work on the top of the loco. Using photos of the loco i located and drill .2mm holes for the lift rings (made by BLMA). I also pre-sprayed them and then just super glued them into spot.  I than chopped up a Leslie S3L-R horn (BLMA) and than glued it back together to form the right shape for a T class. It was than painted black and glue into position via a .4mm hole.  I also noticed in the photos there was a black cap sticking out of the loco near the front lift rings. I have no idea what it is but i used a brass pin head painted black to copy the look. This was also glued in position via a .4mm hole

3. Front Ends
My first plan was to rebuild the front end to set back the top half but i soon found out i that the best way i thought of doing it was going to be to make up a brass etch for it.  I don't have time to do it now, maybe one day. So glued in two set of MU horses and brake pipes (BLMA). I also made up an uncoupling bar.  This was made from .008" phosphor bronze wire made by Tichy train group.  I took me a few goes to get the shape right. It was than painted blue and glued into position

4.The sides
I first played with the fuel tank. I added a pin head for the diesel fuel cap and a piece of .5 x .75mm styrene strip to make a fuel gauge. I then re sprayed the tank in engine black.  I also wanted to add some sanding pipes.  I had to be carefull with this as it could not foul a turning bogie. I first drill a .2mm hole under each sanding box and than i used and formed the .008" wire to make the pipes. It took a few goes to get it right but I'm happy with the overall look. Than painted them black and glued them into position with the holes i had made.  Make sure you dont glue the pipes to the fuel tank.  The tank needs be free to take apart the loco. 
I did not add windows or wipers to the cab as i need it to be open for the sound to come out!

 This is the look im after, well worked locos
Weathering
This is a great topic, some people love it and others hate it.  I have a simple rule for this. If the loco is to be running on a layout it should be weathered, if its going to sit behind glass all its life don't weather it.
Once again this is the first time Ive weathered something so i spent some time looking and talking about it.  I found the whole process really easy to do. 
So for me some of my locos will be strongly weathered and some will be lightly weathered.  For this T class it was going to be strong weathered loco to come a cross a well used loco.
I first give the hole loco a wash in a mixture of india ink.  I made the wash about 1 part ink to 10 parts water.  Maybe a little bit weak but i gave it a couple of coats.  I then used a brush, spit and black pastel and rubbed into all the grills, vents and front ends.   To get the dusty look i used Floquil "Earth" and than a lighter coat of Polly scale "Mud". Both was air brushed on using a fine mist and with the brush set back a fairway from the loco.  Thats all i did for weathering. I'm yet to add a coat of dullcote.

So in the end it was great fun and i found it gave the loco some life. Its not a perfect job but I'm happy with the results.  I hope by reading this it may give you some ideas on what to do on your loco and guess what it wasn't that hard to do. Here are some Before and after photos of the loco. First 3 are straight out of the box and the last three are of the finish result for part one.
Remenber to click on the photo to make it bigger


I hope to get part 2 up soon. I'm just chasing a part for the marker lights but I'm hoping to get it this week. 

PS. Im looking around for a CNC milling machine if anybody knows of a second hand or new one please email me a bendigonscale@live.com.au  Im looking for a hobby size one.

Saturday 22 October 2011

Quick update

Well its be awhile between postings, but things have been progressing well. The design work for the points has been going well. Im now at the stage of talking to different companies on making up the jig.  Hoping to have the first point made by the end of Nov.  Since Spirit design have brought out there much awaited air con pass cars ive been busy putting them togethere.  As always it is a great kit and they look really good.  I will post some photos and blog on what extra bits ive done soon.

One of the major projects ive been working on is the aust-n-rail VR T3 desiel loco. I plan to do a 3 part blog on this loco. The parts will be 1. Super detailing and weathering, 2 Adding marker and headlights, 3. adding sound to the loco.  I hope to have the first part up at the end of next week. Im in the process of making a new lower front ends.

Above in the two photos sits a straight out of the box Aust-n-rail T3 leading a T2 with a 10 wagon cement train in the yard of "Fish Creek'.  Hoppers made spiritdesign.  A few mintues later a fast wheaty pulled by vline B class goes flying through. I wonder if the drivers of the VR loco noticed the new company passing by.  

Monday 19 September 2011

Hand Laying Track Part 1

MAIN LINE AND YARD TRACK

Sleeper jig
As i wanted to hand lay my track and being lots of it to lay i needed to come up with a away to be able to get great looking track but not taking a long to to build.  I found the best way of building the track will be with a help of a jig.  So i set out on design work on the jig.  Using the VR f plans i was able to make up a design using the correct sleeper spacing for the track.  One for the main line with stagered rail joints and than for  sidings i would use square joints.  Once the design work was done it then was laser cut by Spirit design.
Remember to click on the photos for a bigger picture

Track jig laser cut by Spirit Design


Sleeper plates
I also wanted to have sleeper plates under the rail.  I belive this will give the veiwer of the layout something more to look at.  The extra detail will just finish of the scene and also give it a wow factor.  Once again i knew i would lose a lot of time if i was going to have to glue each sleeper plate to each sleeper.  With the spacing for the sleepers already done it was just a matter of placing the sleeper plate etch design over the slots and than joining all the sleeper plates with a connecting strip.  This strip would sit under the rail and would be very hard to see.  The sleeper plates have been etched from .3mm brass.

Making the track.
So putting it all togethere is really easy.  It all can be done in a few simple steps. In this im building the main line with micro engineering code 55 rail but its the same procces for the yard but using code 40 rail.  First i cut the rail length to the correct scaled size ( 85.72mm). I then joined the rails togethere with the etching of a joint bar on both side and than it is solded togethere.  This forms a very soild joint.

Once the all rail is joined it is than solded to the sleeper plate etch. I than place pcb sleepers in the jig and the rails are than solded to the pcb.  This gives it great strength.  Once the gaps are filled and painted you cant tell the difference between the wooden sleepers to the pcb.  Once both sides of the rail are done making sure it in gauge the whole thing is lifted out of the jig.  At this point the rails and plates get there colour.

Rails and plates painted

Rails joined to sleeper plates


The next step is to then place the pre painted sleepers in the jig. Im using wooden sleepers from fast tracks.  They come in a bag of 1000 and work really well.  Once all the sleepers are in place in the jig, super glue is than runed along the under side of the rail and than place on top of the sleepers.  The sleepers sit up from the jig so the rails will not glue onto the jig.  Once set the whole track is lifed up out of the jig and can be glued onto the layout.  Droper wires for power are solded to the under side of the rail before gluing down on the layout.

Another way of doing it would to place the sleepers in the jig and using tape place on top and lift out of jig and glue down on the layout. Remove tape afer glue has dried. Paint sleepers on layout and than place the pre gauged rail on top.  Both ways work really well.

As this has been the first trail of hand laying the track ive been very happy with the results.  There are a few things to fix.  My etching design needs a slight improvement just to get things to sit a bit better for a better look.  Im still working on colours as im not happy with the rail or sleeper colour.  Trail and error is always good fun and a great lerning time.  Im now working on the design work for the points which will use the same process as straight track. I will soon post on this.


A Spirit Design JX on the track

Once again please feel free to contact me with comments, ideas or even photos of bendigo yard around the late 60's to early 70's at bendigonscale@live.com.au

Saturday 3 September 2011

Introduction

INTRO
Welcome to my blog.  I aim to share as much info and doings on what progress is made on my layout Benidgo. I plan to post at least every two weeks. As many people do ive spents months trying to find a location to model on.  As space is not a real problem(thats a good thing about N scale), i always wanted to do a large depot.  I like the idea of having some people running trains run around out on the main line, while there are other people in the yards with yard pilots making up trains.

So i started to look at depots around victoria i knew i wanted to model around the 60's-70's. Web sites like victorianrailways.net make this an easy task. With so many diagrams of locations it was great to compare with.  I wanted a place that had double main line that either went into single line or had a branch line near by.  A good yard for shunting and loco yard. In the end it come down to a top three. Seymour, Marybough and Bendigo.

WHY I WENT FOR BENDIGO
All tho bendigo has the biggest yard out all of them, i like it because of the facitlies it has and all the different types of trains that went through.  From having large holding sidings, stock yards, engine repair shop, a large engine shed with turntable and goods shed, two platforms and docking platforms and going up to north bendigo workshop and a flour mill siding in the middle.  This all added up to having lots of trains running with lots of people or even just one person having fun. Another reason for doing bendigo is that i have family that have lived in the area for over 100 years so it just seem right to do it.

THE MASTER PLAN
Now with the location made, how was i going to go about it. This is going to be that one layout that i will build and run on for the rest of my life so i made the choice of doing it to scale (1:160).  As i plan to go from A box right through to D box it soon become a huge layout. It has worked out going from A box to the end of the platforms is just under 11 meters long.  C and D box will do a 180 and run the other way on the other wall.

The layout will be built in modules and will start at A box and go on from there.  Once the layout is in its final resting place i will extend the double line from A box towards melbourne and from D box the three single lines will be a reverse loop.
A and B box
Download from victorianrailways.net


C and D box
Download from victorianrailways.net

 
CONSTRUCTION
To me a good layout is not just having nice looking trains running around but having all the little extra things. I plan to have scenes all types found on the railways, working semaphore signals and wsa point levers and yard lights and houses and streets to tie it all togethere.  When it came to choose what track to use it got me thinking. I really dont like atlas or peco track its just too over scale.  I liked micro engineering track but the range of points is not very good. So it only left for only one thing and that was to hand lay the track.  Most people say its in the too hard basket but with the right tools and jigs its really not that hard.  In my next post i will go into how to do it and start will explain more on what is planned for bendigo A box.
There is a email address that if you have any questions, thoughts or even photos of bendigo please contact me at bendigonscale@live.com.au
cheers luke