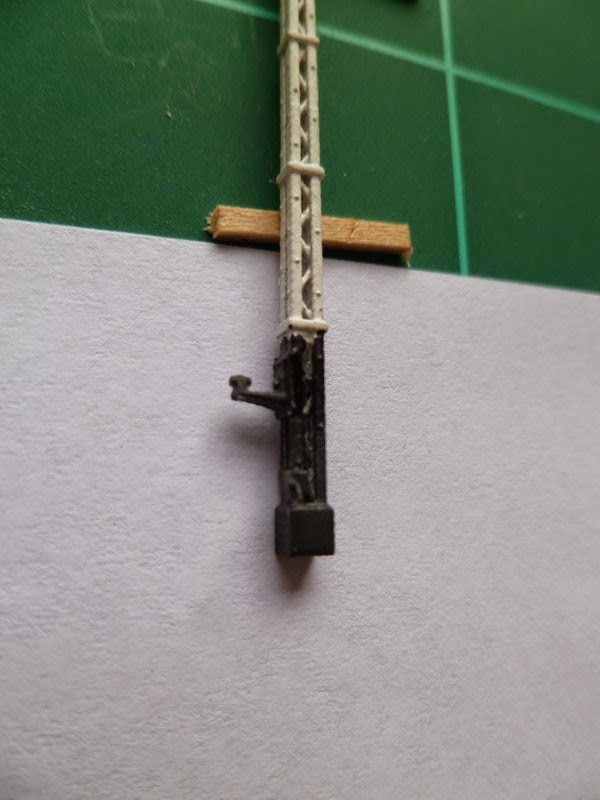
Hi all, life is keeping me busy, but i've had some time to do some modelling. I've had a second run of 3D items which worked out ok. They printed many items on a different axis which resulted in a poor print. This was ok as I had forgot to add many items back onto the signal post while editing the things I need to fix. I now have a 3rd run in the post and hopefully I've got it all right so I can write up instructions and than do a production run. In the mean time I have been working on other 3d printed objects and also learning more parts to Cubify software program. Recently I've started work on the spray etching tank. I'm hoping this will give me a good enough result to start etching my sleeper plates and than finally start building track, which is very over due. I'm hoping to finish the tank within the next two weeks and ill post some pictures than.
Well I think that's it for now, hopefully I will have good news about my 3d printed signals this week and I look forward to making them available to everyone. Below is a lovely picture of R 761 in the sunlight. The photo was taken from Steamrail website, which is well worth a visit.
Friday, 4 July 2014
Friday, 9 May 2014
My first 3D print
Well i have got my first 3d print from Shapeways and i'm fairly happy with how it went. There are a few things i need to change i'm always pushing the design rules. A few holes need to be bigger and a couple of items need to be made bigger so they can print. This is just a quick post just to get some of the photos up. I will do a full review soon. I rushed the paint job, had a few bad brushes and a used a new undercoat. I did't like it so i will go back to my old one. This one was to thick. I wanted to get it reday for a meeting and had very little time this week. As it was only a test piece im not to fussed about it. The signal finial printed in two pieces so i had to glue it back on. Design fault. opppys! Signal lamp has a Nano led in it. Look great when turned on. The rail chair for the turnout im really happy with as well. Anyway here are the pics, more info to come soon. Enjoy
Note The camera picks up the printing layers, but to the eye it had to see them in real life.
Click the pictures to make them bigger
Sorry about the photo placement. I'm still having trouble with the way it is letting place the photos


Note The camera picks up the printing layers, but to the eye it had to see them in real life.
Click the pictures to make them bigger
Sorry about the photo placement. I'm still having trouble with the way it is letting place the photos
Wednesday, 26 March 2014
3D Printing Preview
Well as promised here are some screen shots of the 3D printed items i've been working on. The drawings are all at different stages of production. I use a software program called Cubify Design. Its is fairly easy to use, but it is like learning a new language and there have been some frustrating drawing sessions. Progress is going well and I'm hoping to send off the first test print very soon. Most of the items are very slightly over scale. This really frustrated me, but to make it all work it had to been done. When look back at now its ok, as it all blends in well because they are all slightly over scale so it can't be noticed unless you get the ruler out. Enjoy
Click on the picture to make bigger
2 Position Semaphore signal
In the stop position

In the proceed position
Joint bars

WSA turnout lever

The frame work is not finished yet but I'm hoping these work like a treat. When the yard turnout moves, the lever moves as well, very cool i think. If you haven't noticed i like things to move on my layout. I feel it adds so much to it.
Well i hope you have enjoyed looking at what I've been working on. Hopefully in the next post i will have these parts in my hands!
Any question on 3D printing feel free to email me at bendigonscale@live.com.au
cheers
Click on the picture to make bigger
2 Position Semaphore signal
In the stop position

Showing the whole signal
(note concrete base missing)
There is still more work to been done on the post. The weighted arm and its bracket are still been drawn and also the cable wire wheel also needs to be done. I would like point out there are a few parts that will get printed separately to allow for them to move.Joint bars

These parts are going to be used to join the rails together. I was going to etch these at first but i can get far better detail with 3D printing. I'm not sure if i will do multiple prints of these or do a fret and than cast them. Still thing about this.
Rail brace
This part is used on the turnout to brace the rail on the outside where the point blades are. It will add a nice touch to my turnouts, hopefully.WSA turnout lever

![]() |
| In the reverse position |
Well i hope you have enjoyed looking at what I've been working on. Hopefully in the next post i will have these parts in my hands!
Any question on 3D printing feel free to email me at bendigonscale@live.com.au
cheers
Monday, 10 March 2014
Building the modeling desk Part 2
Well the modelling desk is pretty close to finish now. Just
a few minor details need to be done. The
selves went in really nicely and all works well. I just need to add some lights
and its all good to go. I’m really happy
with it as has given me heaps of room to do all my modelling.
I recently did another test etch with a different etching solution that i had been reading up on. I’m not happy with the results. It proved to be a very uneven etch and took way to long (20mins). Not all is lost as i got my alignment perfect this time which i was happy about. With that all happing i wasn’t really sure what to do next, but luckily for me i had a chance to talk to Phil Badger from Badger Bits and he gave me a lesson on how to do. Phil is the guy to talk to about this as he used to teach etching in tafe and has done many etching himself. He made some great points and i learnt a lot in the 30min chat we had. So it’s back to the drawing board for a new etching talk which means track work is on the back foot again but hopefully for not long. For some reason I’m really keen to have sleeper plates on my track so i have to get this right before anything else can move along. Very frustrating, but I’m sure the results will pay off with some very nice and once off looking track.
In other news I’ve been working on several different 3D
printing parts as well, which are looking very nice. I will post some pics of
them later on this month. I thought of
getting the sleeper plates 3d printed, but i need them to be brass as it will
conduct the power to the rails.
Thursday, 6 February 2014
Building the modeling desk Part 1
With our
recent house move i needed to make a new modelling desk. I normally have a few
projects on the go at once so i need some good working space. When i was making
up the design, i decided to have 3 main
sections on the desk. Machining, Assembly
and a drying/holding section. The room the trains are in now has a nice window/
door way area. I wanted to be near a window for the views, but mainly so i can
have the window open when working with glue and soldering. Down below are the materials i used and an
outline on how i built it.
Materials used.
Materials used.
4x 1800x
600x 18mm laminated pine sheet (desk & boxes)
3x 1200x
140x 19mm pine plank (upper shelves)
2x 1800x 140x
19mm pine plank (upper shelves)
1x 1200x 184x
19mm pine plank (upper shelves)
1x 1800x
184x 19mm pine plank (upper shelves)
3x 1200x
600x 3mm Mdf sheets ( backing on shelves & boxes)
5x 550mm shelve
running kit
100x 25mm timber
screws
I first made up the two boxes. These boxes are at each end of the desk. They are 720mm high by 600mm wide and 550 in depth. First i needed to trim down the laminated pine sheets. I trimmed off 40mm on the sheets. This was down to make a 40mm lip on the desk. I used a power saw and a metal guide bar to get a nice straight line when cutting the wood. Next was to install the draw runners. These are very easy to install. I set the centre height i wanted for each draw and than drew a line across the two sides of the draw. I than screwed in the runners with the supplied screws, using the line as a guide. The boxes were than screwed together using the normal method of using a pilot hole, and counter sinking the screws. A 600x 600mm Mdf sheet was nailed onto the back of the boxes to act as a backing.
Next was to cut the desk out, this was fairly easy to do. Because i have an angle turn in the desk i had to get angle right before i made the cut. One length is 1800mm long and the other side is 1000mm long, both 600mm wide. Once this was done the desk was screwed down from under the desk through the boxes. I also screwed in a piece of wood to support the join on the desk.
| Half finshed desk |
| Half finshed desk |
Sunday, 22 December 2013
2013 in review, what's planned for 2014
Well It’s come to the end of another year so I thought I’ll
give a review of the year of what’s happen and what’s planed for 2014.
2013 has been very busy outside of Bendigo, a house move,
working lots of days and the birth of our daughter, time sure has disappeared.
With all that happing not much was done on Bendigo. I was hoping to have most
of the rail laid by now. However many parts have been design for etching which
took a lot time. I had to spend a lot of time making up parts for the future to
fill up the minimum A4 sheet needed for the etching house. Once that was done I
them made the decision to do the etching myself. I’ve also have decided that some
of the etch parts I will now get 3D printed, which will be better with detail
and strength. So it was a wasted few months, but many things were learnt so
there is still a positive to it.
Doing my own etching has been a great learning process. The
first run didn’t quite work out, but I was still very happy with the
result. I’m now looking at a new etching
solution that does not need to be heated. I’m in the process of getting these
acids. Having a non heated solution will
be a lot easier to use and I will be able to build a simple etching tank.
What’s for 2014
The first thing for 2014 will be the construction of my new modelling
desk. This will be a purpose built desk
that will give me plenty of room to work on all my projects. I normally have a
few projects on the go at once, usually a loco, rolling stock, a building and
track work. So having set areas of space is important. The desk is 1800mm long by 600mm wide and
also 600mm high. The angle bit is 1000mm
long and has the same height and width.
I have also made a top self to run a bit of track for programming loco
and speed testing. The middle tower will
hold power packs, soldering iron and a Pr3 interface. The two boxes below will
hold draws, the one on the left will hold a mitre size and other tools. The one
on the right will be for storage of models that are drying. The desk will have
three many sections from left to right, Machining, Assembly, and Holding. I
look forward to getting this done as I will be able to unpack all my train
stuff and I won’t need to use the old small round table.
Click to make bigger


Once the desk is done I planned to get right into rail
laying. I hopefully my etching skills will be ready and my 3d parts as well. I
plan to start with the straight track and then moving onto the turnouts. I will
also be starting work on the brick/stone road bridge as this needs to be done
so i can get the landscape heights right.
2013 had many learning curves, slow progress on
the layout but I’m hoping in 2014 will show the fruits of 2013. I would like to
wish everyone a Merry Christmas and a happy new year.Friday, 15 November 2013
My first etching
Well I got to do my very first etching the other day. It went fairly well, there are few things to work on, but it was a great first effort. I wont go into too much detail on the process, as I want to be able to get all the steps 100% right first.
The main thing that went wrong in this test was that the top pattern moved by about 0.5 mm to 1mm in the exposure process, which lead to the holes not being perfect. I felt I got the etching time right, however I do need to build an improved etching tank. I will need to make one that will be able to take A4 size brass sheets. I’ve added some photos below of what went on. You can see in the final shots of the brass how the topside is not right, but is something that I can work on. I used .25mm brass sheet in this test.
I hope I will be able to do a more in depth blog on the whole etching process soon.
Subscribe to:
Posts (Atom)